
Are you tired of looking at that drab basement ceiling? You’re not alone. Many people find themselves craving a fresh, inviting space beneath their homes. It’s easy to overlook the ceiling when it comes to home decor, but a new look can completely transform your basement. That’s why I created this post, to help you discover simple and budget-friendly ways to spruce up your basement ceiling.
If you’re a homeowner or a DIY enthusiast who loves creative decor, you’re in the right place. You probably care about making your home feel cohesive and stylish without breaking the bank. This guide is packed with 16 inexpensive basement ceiling ideas that are not only affordable but also incredibly easy to install. You’ll find options that fit various styles, from rustic to modern, ensuring there’s something for everyone.
Get ready to dive into a world of DIY basement decor! You’ll learn about different ceiling options that add character and charm to your space. Whether you’re looking for a rustic vibe with wood planks or a fun touch with chalkboard paint, this guide has got you covered. You’ll walk away with plenty of inspiration to create a cozy and inviting basement atmosphere that you—and your guests—will love.
Key Takeaways
– Discover 16 affordable and easy-to-install basement ceiling ideas that can transform your space without a hefty price tag.
– Explore different styles, from rustic wood planks to vintage tin tiles, allowing you to personalize your basement decor.
– Learn practical tips for installation, ensuring you can tackle these projects even if you’re a DIY novice.
– Find creative solutions like fabric draping and chalkboard paint for a fun, unique touch.
– Get inspired to turn your basement into a cozy retreat that adds value and aesthetic appeal to your home.
Recommended Products


This specially formulated Touch-Up Paint designed specifically for ceiling tiles and acoustic panels. Whether you need to cover small blemishes, scratches, or touch up areas of discoloration, this paint is your go-to solution for restoring the pristine look of your ceiling surfaces.

Restore, Don’t Replace: The Smarter Ceiling Solution – RENEW Acoustical Ceiling Tile Restorer offers a cost-effective way to refresh stained and discolored ceiling tiles without the hassle and expense of full replacement. This high-performance coating conceals water damage, smoke stains, and dirt, restoring ceilings to a clean, like-new finish
1. Painted Ceiling Tiles
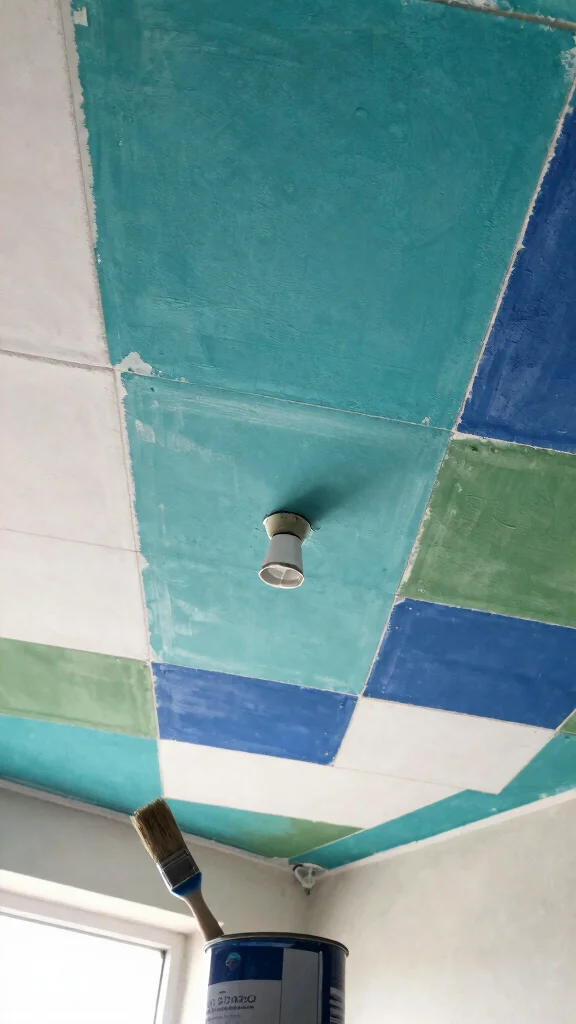
Transforming your basement ceiling with painted tiles is an accessible and budget-friendly option. The simplicity of plain white tiles can be elevated with a coat of color that resonates with your personal style. Whether you choose a calming deep blue or a vibrant hue, this approach not only rejuvenates the space but also reflects your individuality. The process is straightforward and requires just a few basic tools for a stunning result.
To ensure the best outcome, make sure to clean your tiles thoroughly before painting for optimal adhesion. If you’re going for a darker shade over white, a primer will help achieve a richer finish. Additionally, opting for paint specifically made for ceilings will minimize streaks and ensure a smooth application.
Consider these tips to maximize your painted tile project:
– Pair white tiles with a bold color like charcoal gray.
– Use a soft pastel for a calming vibe.
– Incorporate a glossy finish to enhance light reflection.
This simple yet effective update can bring a unique flair to your basement, with textured surfaces enhancing the overall aesthetic while reflecting your style.
Recommended Products

Residential Use Only: Made for residential ceilings, made of soft foam not for commercial use

REAL WOOD – Made of 100% dried fir wood imitating vintage reclaimed barnwood appearance for interior finish. The colors will vary from browns to grays depending on the batch.

Made for residential ceilings, made of soft foam not for commercial use.
Difficulty Rating & Requirements
Overall Difficulty Rating: Medium
This project is rated medium because it requires basic to intermediate skills in home improvement. It is suitable for DIY enthusiasts who have some experience with tools and materials but may not be ideal for complete beginners. You should feel comfortable following instructions and using a few basic tools.
Time Estimate: ⏱ Estimated time: 8-20 hours
The total time varies depending on your chosen ceiling option:
– Planning & Material Gathering: 2-4 hours
– Preparation (cleaning and measurements): 1-3 hours
– Installation: 5-12 hours, based on complexity
– Finishing Touches (painting, decorating): 1-2 hours
Skill Requirements:
– Required skills: Basic carpentry, measuring, painting, and possibly electrical work for lighting.
– Beginner-friendly: No. While some options are easier than others, a grasp of basic home improvement principles will help you succeed.
– Skills that can be learned include measuring accurately and using basic tools. However, more advanced skills, like electrical installation, may require prior experience or assistance.
Tools & Materials Needed: 🧰 Essential items checklist
– Measuring Tape (Required)
– Level (Required)
– Drill and Drill Bits (Required)
– Ladder (Required)
– Hammer (Required)
– Screwdriver Set (Required)
– Paint or Stain (Optional)
– Drop Cloths (Optional)
Step-by-Step Overview:
1. Planning and Design (2-3 hours): Choose your preferred ceiling option and sketch out a basic design. Gather materials and tools needed for the project.
2. Preparation (1-3 hours): Clear out the basement and ensure the ceiling surface is clean. Take accurate measurements for any structural changes.
3. Installation (4-12 hours): Depending on the complexity, install your chosen ceiling solution. This may include laying tiles, attaching wood panels, or painting.
4. Finishing Touches (1-2 hours): Add any decorative elements like lighting or stenciled designs. Clean up and check for any touch-ups needed.
Professional vs DIY:
Hiring a professional can cost anywhere from $1,500 to $3,000, depending on the complexity and materials used. If you choose to do it yourself, you could spend between $200 and $800, making it a budget-friendly option. Consider hiring help if you’re not comfortable with electrical work or if your basement has structural issues that need addressing.
Overall, tackling a basement ceiling project can be rewarding. With the right skills and planning, you can create a stylish and functional space without breaking the bank.
Recommended Products

Dimensions – 4 faux textured tin tiles per pack – 10.5 inches x 10.5 inches

【1 PIECE 12×12" TIN PANEL】– Please note this is a sample panel,approximately a 12 x 12-inch portion of a panel and will not lay into a standard grid. For larger size, please go to our "pack of 5pcs 24×24"".

Elegant Design & Versatile Application – Enhance your space with PVC ceiling tiles designed to add depth and character to any room. Suitable for residential living areas, offices, retail spaces, and commercial interiors, these 2×2 ceiling tiles provide a refined, embossed look inspired by classic metal styles at a cost-effective price.
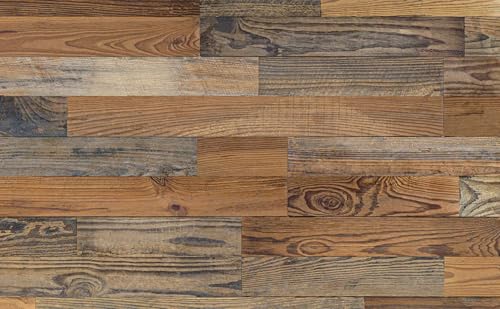
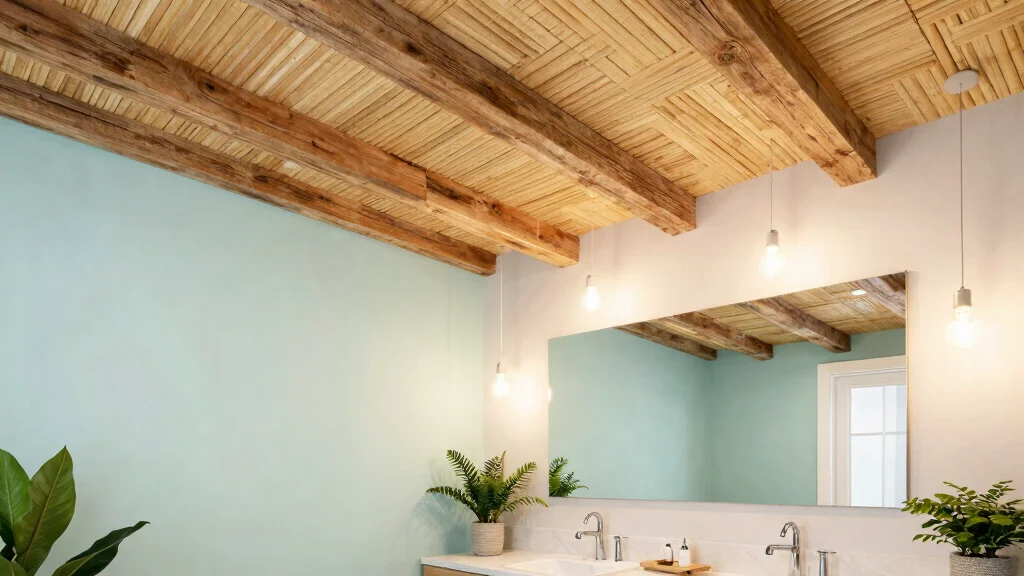
2. Wood Planks for Rustic Charm
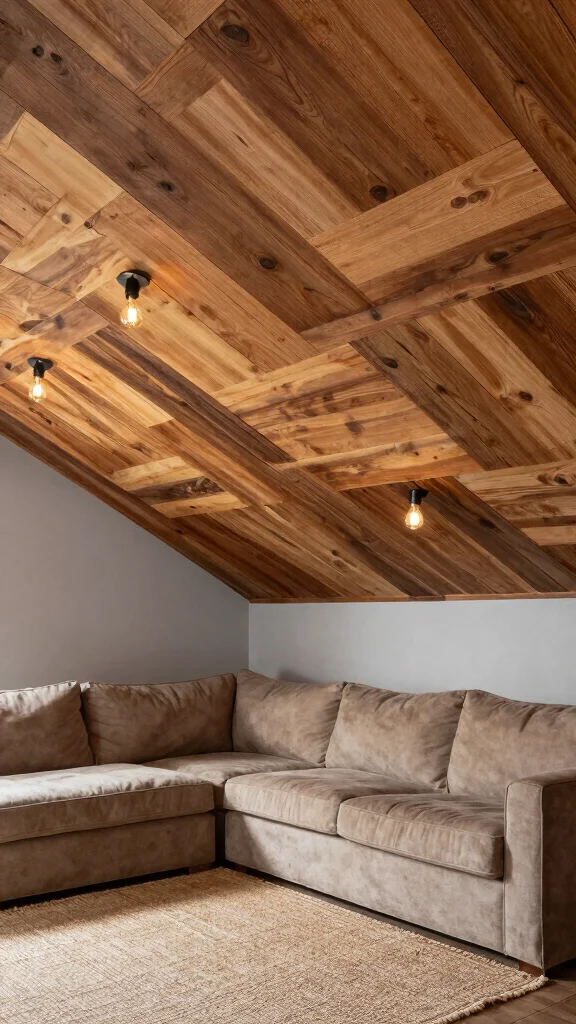
Wood planks can introduce a cozy, rustic charm to your basement ceiling. Whether using reclaimed wood or budget-friendly plywood, this material brings warmth and character to the space. Covering your ceiling entirely or arranging the planks in a modern grid pattern can create a visually appealing ambiance.
For a successful installation, start with a level reference line to ensure everything aligns properly. Secure the planks with construction adhesive and nails, and select a stain or finish that complements your existing décor. This approach allows you to personalize the look to fit your style.
Here are some ideas to inspire your wood plank ceiling:
– Install reclaimed barn wood for an authentic rustic touch.
– Use lightly stained plywood for a contemporary twist.
– Incorporate varied wood tones for added visual interest.
Using wood planks not only enhances the basement’s aesthetic but also creates a warm, inviting atmosphere that feels like home.
Recommended Products

Easy Installation: These 24×48 drop ceiling tiles are designed for quick and hassle-free setup. Easily lay into a standard 15/16" ceiling grid or glue directly onto flat surfaces—perfect for DIY ceiling upgrades

Ceiling spray paint blocks stains and primes interior surfaces for quick touch ups

new living spaces,
3. Fabric Draping for Softness

Fabric draping can add a soft, whimsical touch to your basement ceiling. Lightweight materials like muslin or sheer curtains can create an ethereal effect, transforming the space into a cozy retreat. This technique is perfect for creating a lounge area or an inviting nook where comfort meets creativity.
To achieve this look, measure your space carefully and choose fabric lengths that work for your design. Utilize adhesive hooks or a ceiling track to hang the fabric, allowing it to cascade down gracefully. Selecting colors and textures that harmonize with your decor will enhance the overall vibe.
Consider these creative fabric draping ideas:
– Mix and match patterns for a bohemian feel.
– Use twinkling lights behind the fabric for a magical glow.
– Incorporate rich jewel tones for a luxurious touch.
This technique not only adds depth and character but also contributes to noise reduction, making your basement feel tranquil and inviting.
Recommended Products

Stylish – Authentic wood looking and grain texture, adding timeless feature for your home.

RECLAIMED WOOD ACCENT: Real reclaimed and recycled wood, naturally-weathered wood paneling adds a beautiful, rustic accent to your walls
[Luxdecor Real Wood Wall Planks]:100% Real Barn Wood Wall Planks With Natural Knots and Dents, the Surface Of Wood Shiplap Planks Is Processed With High Temperature Carbonization, the Real Wood Wall Shiplap Planks Is Non-Toxic, Sterilized and More Safe For Children,Voc Free Process Ensures These Stick on Shiplap Planks For Walls Are Safe To Use In Home
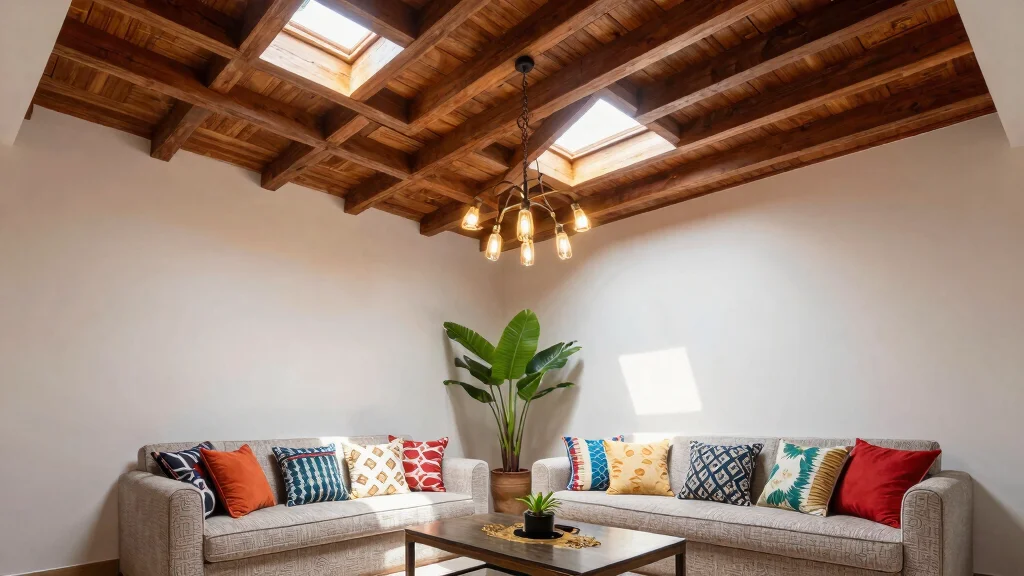
4. Faux Beams for Added Dimension
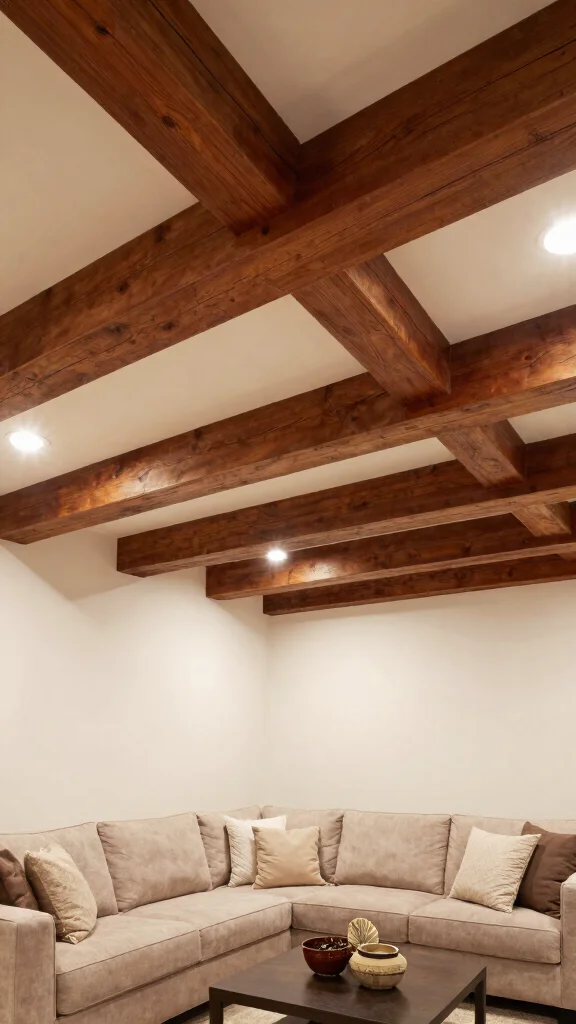
Faux beams can instantly elevate a flat ceiling, adding depth and character to your basement. Made from lightweight materials like foam or composite wood, these beams are easy to install and can be customized to fit your aesthetic. You can choose to paint them to match your decor or leave them natural for a rustic feel.
To install, begin by measuring your ceiling to determine the best placement for the beams. Secure them with adhesive or screws, ensuring they are straight and level. Using caulk to fill any gaps will give your project a polished finish.
Here are some design tips for using faux beams:
– Stagger the beams for a dynamic look.
– Outline specific areas, like a seating nook, with beams.
– Paint beams a contrasting color for visual interest.
This addition not only creates a warm, inviting atmosphere but also enhances the overall design of your basement, making it feel more spacious and cozy.
Recommended Products

Vintage Faux tin tile backsplash

⚠️ 𝐀𝐭𝐭𝐞𝐧𝐭𝐢𝐨𝐧: For latex walls or repainted, 3M spray adhesive is recommended as assist ❗❗
Elegant Design & Versatile Application – Enhance your space with PVC ceiling tiles designed to add depth and character to any room. Suitable for residential living areas, offices, retail spaces, and commercial interiors, these 2×2 ceiling tiles provide a refined, embossed look inspired by classic metal styles at a cost-effective price.
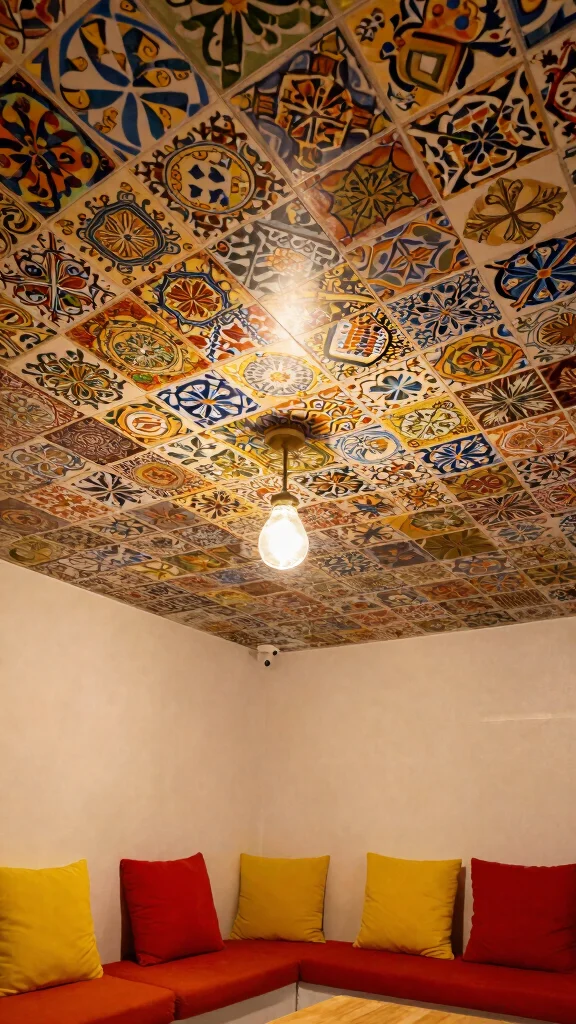
5. Tin Tiles for Vintage Flair
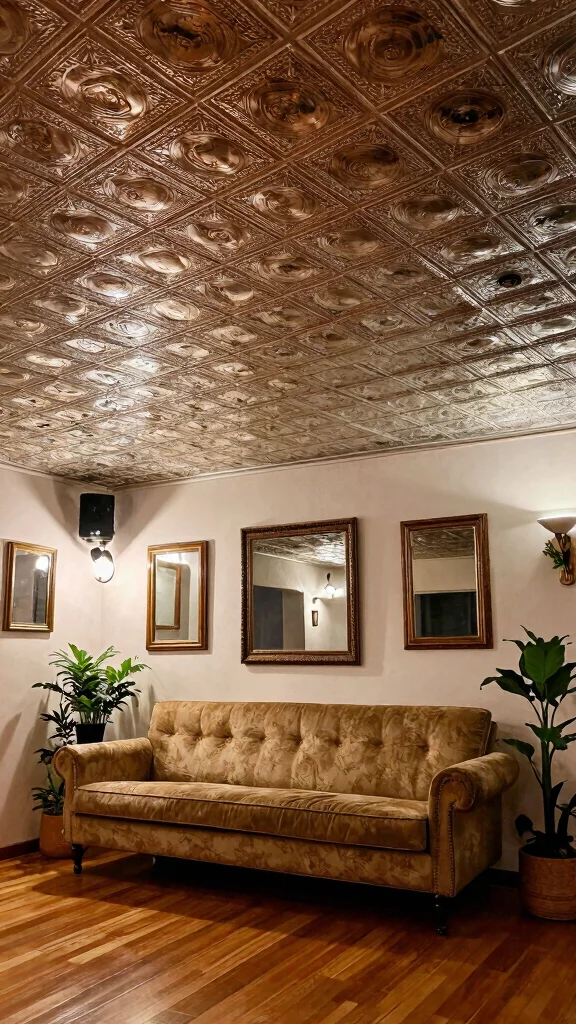
Installing tin tiles on your basement ceiling adds elegance and a vintage touch. Available in a variety of designs, these tiles can brighten up a darker space while showcasing unique patterns. The reflective surfaces create a stunning visual appeal that captivates the eye.
For a successful installation, start by measuring your ceiling and cutting the tiles to fit. Adhere them using a strong adhesive to ensure they stay in place. A finishing seal can protect the tiles and enhance their shine, making them last longer.
Consider these ideas when using tin tiles:
– Mix different patterns for a unique look.
– Use a matte finish for a more subdued elegance.
– Create a border design around the edges for added flair.
This stylish option not only enhances the aesthetics of your basement but also provides a durable and easy-to-maintain ceiling solution.
Recommended Products

VERSATILE LARGE SIZE – This unique chalkboard acrylic paint comes in an 16 oz, wide mouth jar – perfect for all your arts and crafts!
Creates a tough, slate-like chalkboard surface

VERSATILE SIZE – This unique chalkboard acrylic paint comes in an 8 oz, wide mouth jar – perfect for all your arts and crafts!
🏠 Transform Your Space Like a Pro!
Unlock the secrets of DIY makeovers with our comprehensive guide to budget-friendly home decor solutions.
6. Drop Ceiling for Convenience
A drop ceiling is one of the most practical upgrades you can make in your basement. These ceilings consist of tiles that can be easily removed, allowing quick access to plumbing or electrical systems above. With a variety of colors and styles available, they can fit seamlessly into any decor.
For installation, follow the manufacturer’s guidelines closely for framing and placement. Using a laser level will help ensure straight lines, and if sound dampening is a concern, consider using acoustic tiles for added comfort.
Here are some key points for your drop ceiling project:
– Choose lightweight tiles for easy handling.
– Use a grid pattern for a modern aesthetic.
– Ensure tiles are rated for moisture resistance.
This approach offers practicality while allowing for creative expression through tile choices, making it an ideal solution for any basement.
Recommended Products

【Black Ceiling Draping Set】Pack of 6 black wedding ceiling drapes with lights (a set of 9.8ft warm white light), each ceiling draping panel measures 5 feet(60inch)wide x10 feet(120inch) long. Attach to the ceiling of the venue to soften the space and create a stunning fairytale atmosphere, transform any venue space.Drapes and fairy lights can be used for decoration on both indoor as well as outdoor events

White Ceiling Curtains Package Includes: The package will include 6 panels white wedding ceiling drapes (Not include stand), each wedding extra long curtain measures 5 feet (60inch)wide x 10 feet(120inch) long. 3 Size available can meet your demands for decorating your weddings, parties, receptions, help to create a full and layed sense to your wedding ceiling decoration

【6 Panels White Ceiling Fabric】Pack of 6 panels white wedding drape curtain(without hanging pieces), each wedding extra long curtain measures 5 feet(60inch)wide x20 feet(240inch) long.The sufficient quantity can meet your demands for decorating your weddings, parties, receptions, and these white ceiling drapes for weddings will create a delicate and aesthetic sense to your wedding ceiling decoration and light up every banquet.
7. Cork Ceiling for Sustainability
Cork ceilings present an eco-friendly and stylish option for your basement. Naturally insulating, cork helps control sound and temperature while being lightweight and easy to install. Its unique texture adds warmth and character, making it perfect for cozy spaces.
To install cork, cut the sheets to the required size and use an adhesive suitable for cork to attach them to your ceiling. Sealing with a protective finish will enhance durability and longevity, ensuring your design lasts.
Here are some tips for using cork in your design:
– Pair cork with wood accents for a harmonious look.
– Use natural finishes to highlight the cork’s beauty.
– Create a layered design with different cork textures.
This sustainable choice not only elevates your basement’s style but also contributes to a warm and inviting atmosphere.
Planning basement ceiling ideas inexpensive? Cork ceilings are surprisingly easy to install and eco-friendly. Cut the cork, glue it up, seal for durability, and you’ll add warmth, sound control, and a sustainable vibe without breaking the bank.
You might also like
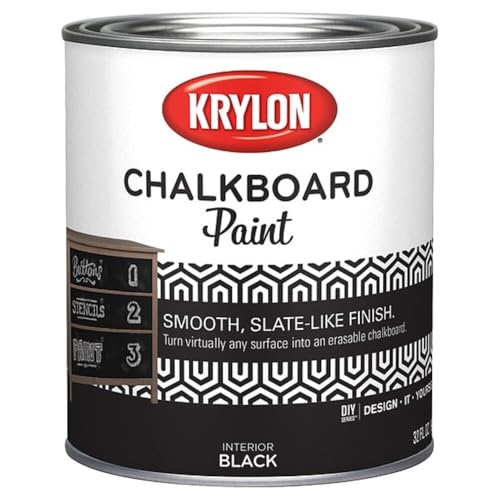
8. Chalkboard Paint for Fun

For a playful and interactive twist, consider chalkboard paint for your basement ceiling. This creative solution allows you to jot down notes, doodles, or drawings, making it perfect for family spaces or home offices where everyone can contribute.
To apply, ensure the surface is clean and primed for the best adhesion. Use a roller for even coverage and allow sufficient drying time before using the chalkboard. Colored chalk can add a fun pop of color to your designs.
Here are some fun ideas for chalkboard ceilings:
– Encourage kids to create art on the ceiling.
– Use seasonal themes for decorations.
– Create a quote wall that evolves over time.
This innovative approach not only adds character but also fosters creativity and interaction within your space.
9. Faux Finish for Artistry
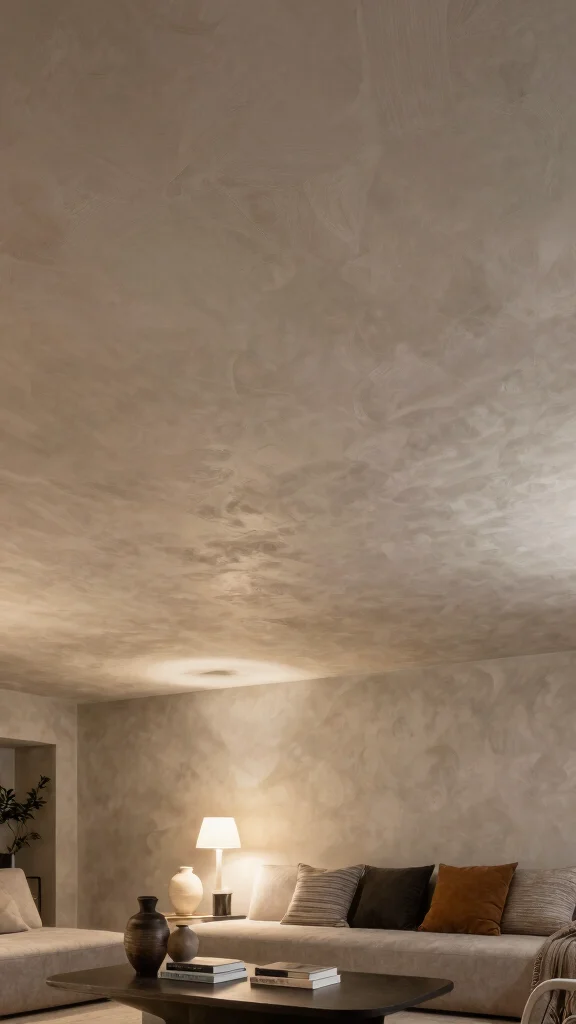
Faux finishing techniques can transform an ordinary ceiling into an artistic masterpiece. Techniques like sponge painting or rag rolling can mimic luxurious materials such as stucco or marble, adding depth and character to your space without breaking the bank.
To achieve a beautiful faux finish, practice your technique on a scrap piece before applying it to the ceiling. Select colors that complement your basement decor and consider layering techniques for added depth and interest.
Here are some creative ideas for faux finishing:
– Use metallic paints for a glamorous effect.
– Highlight architectural features with faux finishes.
– Create faux beams to enhance visual interest.
This technique not only enhances your design but also showcases your creativity, turning your ceiling into a true focal point.
Recommended Products

Ideal for creating a custom interior chalkboard on multiple surfaces including wood, metal, masonry, drywall, plaster, glass, concrete, paperboard and hardboard

Ideal for creating a custom interior chalkboard on multiple surfaces including wood, metal, masonry, drywall, plaster, glass, concrete, paperboard and hardboard

Ready-mixed, grab-n-go white ceiling paint
10. Ceiling Tiles with Patterns
Patterned ceiling tiles can dramatically change the look of your basement, adding stylish flair without a hefty investment. These tiles come in an array of designs, from geometric shapes to floral patterns, allowing for a mix-and-match approach or a uniform look.
For installation, follow the manufacturer’s instructions closely. A grid pattern can offer a modern aesthetic, while random arrangements can create an eclectic feel. Ensure that the tiles are moisture-rated, especially if your basement is prone to dampness.
Consider these design tips for patterned tiles:
– Combine different styles for a unique ceiling.
– Use a bold color palette for high impact.
– Create a feature wall with intricate patterns.
This approach brings visual interest and a touch of personality to your basement, enhancing its overall charm.
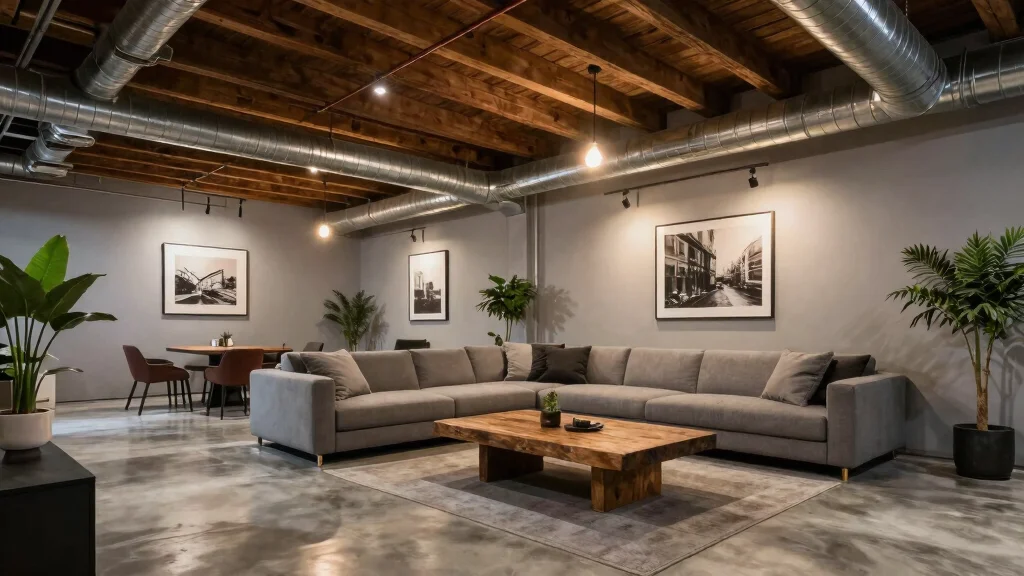
11. Exposed Ductwork for an Industrial Look
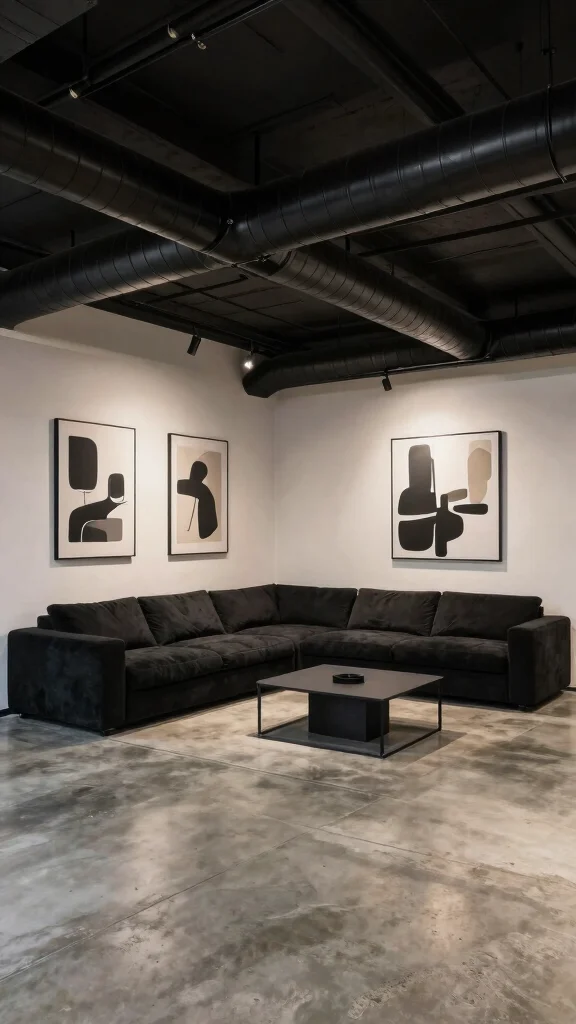
If your basement features exposed ductwork or pipes, embrace this industrial aesthetic for a raw, edgy look. You can leave them as-is or apply a fresh coat of paint in matte black or metallic finishes to enhance their appeal.
Before painting, ensure the ductwork is clean for the best adhesion. Adding ambient lighting around the ducts can create an inviting atmosphere, while pairing the look with minimalist decor adds a chic, industrial feel.
Here are some ideas to embrace this industrial style:
– Paint ducts in matte black for a sleek look.
– Incorporate LED strip lights for illumination.
– Use metal accents to unify the design.
This approach not only highlights structural elements but also makes the room feel larger and more open, a valuable benefit in basement spaces.
Fun fact: exposed ductwork can become a design feature with just 1 weekend and 2 cans of matte black paint. Add warm LEDs to transform a raw basement into urban chic—no full ceiling reveal needed. Budget-friendly, DIY-friendly, and surprisingly stylish.
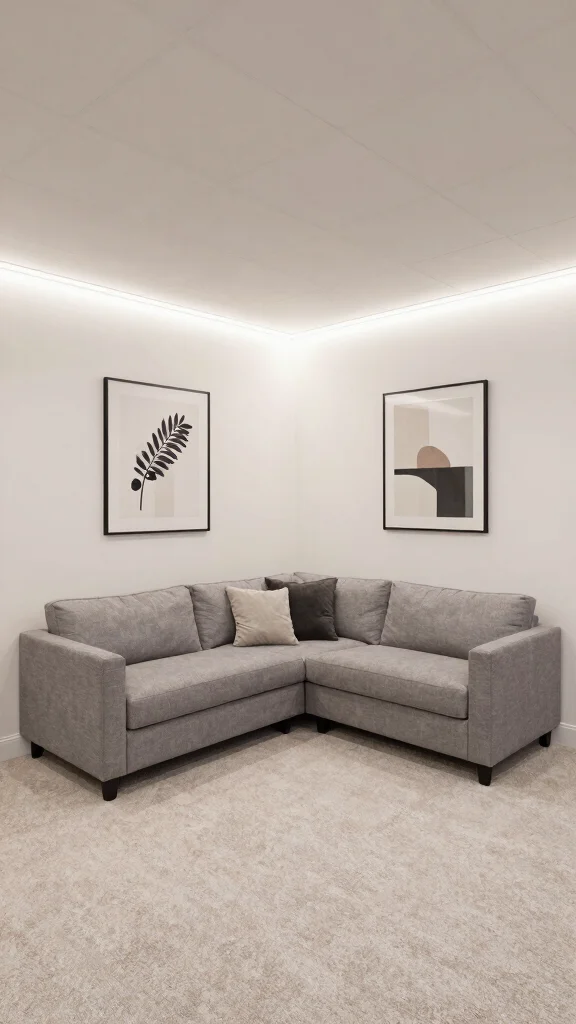
12. Recessed Lighting for Modern Elegance
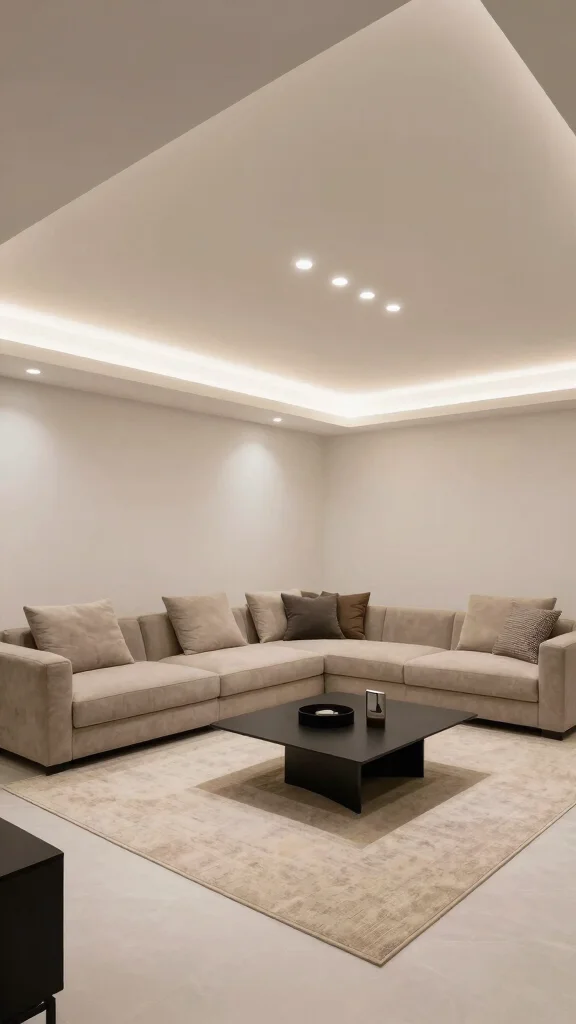
Recessed lighting can significantly enhance the ambiance of your basement while maintaining a modern aesthetic. This sleek lighting option illuminates the space without taking up visual space, making the area feel larger and more inviting.
When installing recessed lighting, plan your layout carefully before cutting holes. Opt for LED bulbs for energy efficiency and longevity, and consider dimmer switches for adjustable brightness to suit different moods.
Here are some tips for incorporating recessed lighting:
– Strategically place lights for optimal coverage.
– Combine with decorative fixtures for layered lighting.
– Use recessed lights to highlight art or architectural features.
This elegant solution can create a sophisticated atmosphere in your basement, especially when paired with other design elements like faux beams or fabric draping.
You Might Also Like
13. Creative Wall-Mounted Solutions
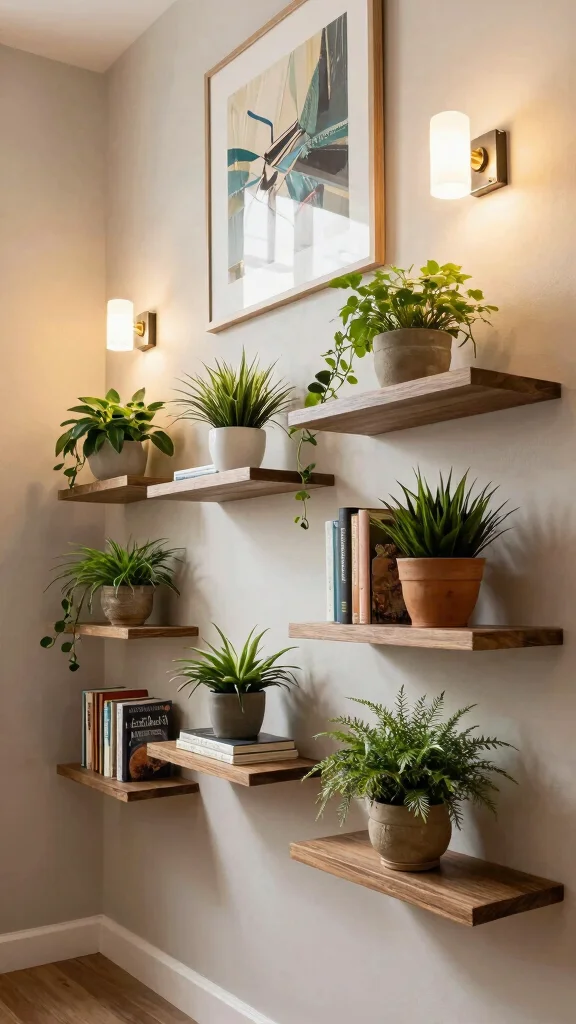
Exploring creative wall-mounted solutions can diverge from traditional ceiling designs. Utilizing wall space allows for dynamic visuals that draw the eye upward, making your basement feel larger and more functional.
Consider installing ledges for plants or books, which can add life and interest to the space. Wall-mounted art can create a gallery effect, while sconces or hanging lights bridge the area between wall and ceiling, enhancing the overall design.
Here are some ideas for creative wall-mounted solutions:
– Install a plant ledge to draw the eye up.
– Create a gallery wall with framed artwork.
– Use sconces for ambient lighting.
These innovative ideas not only enhance aesthetics but also maximize storage and utility, making your basement both beautiful and functional.
Fun fact: simple wall-mounted accents can deliver major wow without ceiling work. With wall art, ledges for plants, and sconces, you unlock basement ceiling ideas inexpensive that visually lift the room, making it brighter, larger, and surprisingly functional.
14. Ceiling Panels for Added Texture
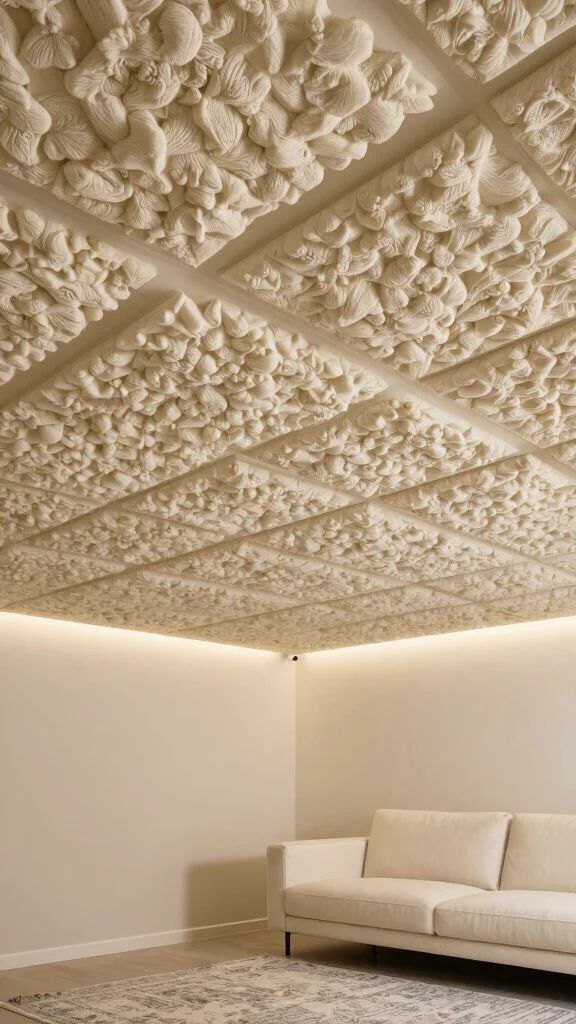
Ceiling panels are an excellent way to introduce depth and texture to your basement without overspending. Available in various materials like foam and PVC, these panels are lightweight and simple to install, making them a practical option.
Follow the manufacturer’s instructions for cutting and fitting the panels accurately. Use construction adhesive to ensure a secure hold, and consider painting the panels for a custom look that matches your decor.
Here are some tips for using ceiling panels:
– Combine textured panels with smooth surfaces.
– Use contrasting colors for visual interest.
– Install panels in a patterned layout for added appeal.
This method not only enhances visual interest but can also help with soundproofing, creating a more enjoyable environment in your basement.
15. Stenciled Designs for Personalization
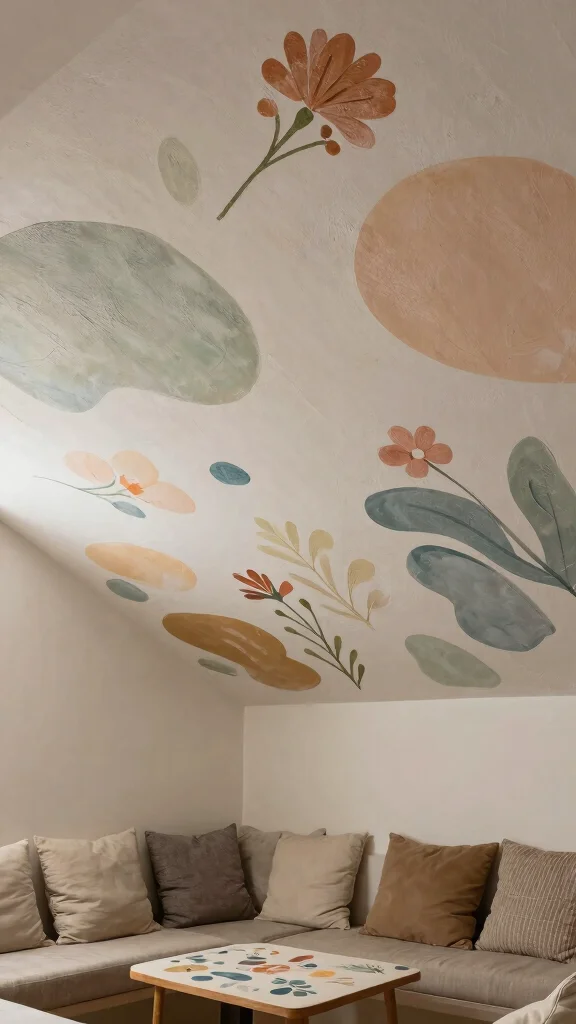
Stenciling is a playful way to infuse your personality into your basement ceiling design. By using stencils, you can create patterns or images that resonate with your style, from elegant florals to abstract motifs.
Start by choosing your design and gathering materials. Use painter’s tape to secure the stencil in place, and carefully apply paint, allowing it to dry before removing the stencil for a crisp finish.
Here are some creative insights for stenciling:
– Combine multiple stencils for a collage effect.
– Use bright colors for a fun atmosphere.
– Create a theme that reflects your personal style.
This engaging approach not only adds character but also creates a unique ceiling that truly represents you and enhances your basement’s overall charm.
16. Mirrored Ceiling for a Glamorous Touch

For a striking and glamorous ceiling, consider using mirrored panels. This design choice can create an illusion of space and light, making your basement feel more expansive and luxurious.
While mirrored tiles can be pricier, there are DIY-friendly options available that will fit within your budget. When installing, use adhesives specifically designed for mirrors to ensure they stay secure, and handle the panels with care to avoid breakage.
Here are some design tips for a mirrored ceiling:
– Use mirrors in sections for dramatic impact.
– Pair with soft furnishings for balance.
– Opt for neutral colors in the room to complement the mirrors.
This glamorous touch not only elevates the aesthetic but also enhances the overall ambiance, creating a chic and inviting atmosphere in your basement.
Conclusion

Revamping your basement ceiling doesn’t have to be a daunting task, nor does it need to cost a fortune.
With these 16 inexpensive and easy-to-install ideas, you can breathe new life into your space and create an inviting atmosphere for family and friends.
Whether you decide to go for a playful fabric draping or a sleek faux wood finish, your basement can reflect your personal style without breaking the bank!
Frequently Asked Questions
What are the cheapest basement ceiling ideas that are easy to install?
Here are budget-friendly basement ceiling ideas inexpensive that are also quick to install.
Options include basement ceiling options like PVC ceiling tiles or panels, which resist moisture and snap into place for a fast update.
Vinyl beadboard panels install on simple furring strips, giving a cottage look without drywall.
Lightweight fabric ceiling panels or stretched fabric provide good acoustics and a soft finish with minimal dust.
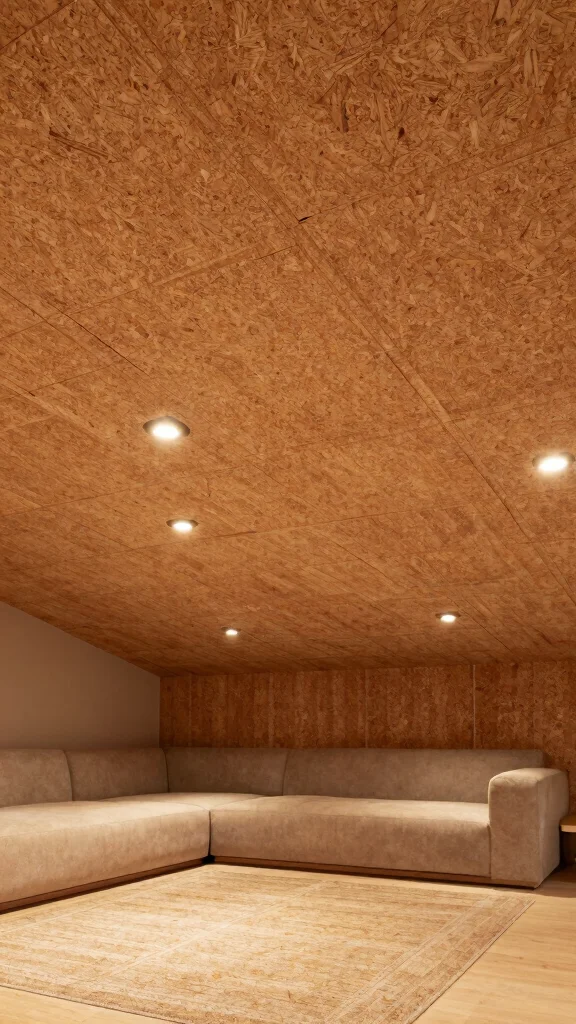
Painted plywood or OSB boards offer a warm, modern vibe on a tight budget.
Foam or polystyrene ceiling tiles give a decorative look that’s ultra affordable and easy to cut.
Tips: start with moisture testing, measure carefully, choose a system that allows access to wiring, and plan lighting ahead for easy installation ceiling ideas.
Which basement ceiling options work best in moisture-prone or low-ceiling basements?
Moisture-prone basements need basement ceiling options that resist humidity. Choose affordable ceiling solutions like moisture-resistant PVC tiles, vinyl beadboard, or foam/Polystyrene panels. For low ceilings, select thin-profile options or a simple grid that doesn’t steal height. Avoid drywall on ceilings in damp spaces; install a vapor barrier behind panels if needed, and leave access to plumbing/electrical. With these affordable ceiling solutions, you can keep the space bright and functional while staying on budget.
How can I install a DIY basement ceiling on a budget without special tools?
Start with a plan and measurement. A typical DIY basement ceiling on a budget can be built with a few easy installation ceiling ideas tools: utility knife, tape measure, level, drill, screwdriver, saw, and appropriate fasteners. Pick one option (PVC tiles, vinyl beadboard on furring strips, or fabric ceiling) and follow these steps: (1) clear and dry the space, (2) attach furring strips to joists if needed, (3) install the chosen panels or tiles, cut around outlets and fixtures, (4) install any lighting or duct access panels, (5) finish with trim. This approach keeps it affordable ceiling solutions and DIY-friendly.
What are some creative and affordable ceiling designs I can try in a basement makeover?
Creative possibilities include: painting and white-washing exposed joists for brightness; installing beadboard or shiplap on a portion of the ceiling for texture; using foam ceiling tiles in a grid for a subtle pattern; fabric-panel ceilings for acoustics; a faux-tin ceiling using lightweight metal-look panels; or combining a bright color with simple molding for a modern look. All of these are basement ceiling options that stay inexpensive while delivering a strong DIY basement decor vibe. Plan lighting to highlight the texture and keep the space feeling open.
What should I consider before starting a basement ceiling project to keep it affordable and durable?
Key considerations: moisture and mold risk, ceiling height, access to plumbing and electrical, and future maintenance. Decide whether you want to hide or expose pipes; choose materials that resist humidity (PVC, vinyl, foam) and avoid moisture-trapping options. Check local codes and ensure proper ventilation. Budget planning should include the cost of panels, furring strips, fasteners, lighting, and tools. With good planning, you’ll have affordable ceiling solutions that deliver long-term value and DIY basement decor success.
Recommended Products

WHAT WILL YOU RECEIVE: 1 Panel Wedding Arch Drapery Fabric, Size: 30 Inch x 20ft (Pre-cut). Available Color: Sage Green, Dusty Blue, Ivory, Black, Dusty Rose, White, Champagne, Burgundy, Blush Pink, Lilac. Soft and lightweight, chiffon draping fabric is a great choice for wedding arch decorations, creating a romantic and elegant atmosphere.

WHAT WILL YOU RECEIVE: 2 Panels Wedding Arch Drapery Fabric, Size: 30 Inch x 20ft (Pre-cut). Available Color: Sage Green, Dusty Blue, Ivory, Black, Dusty Rose, White, Champagne, Burgundy, Blush Pink, Lilac. Soft and lightweight, chiffon draping fabric is a great choice for wedding arch decorations, creating a romantic and elegant atmosphere.

WHAT WILL YOU RECEIVE: 1 Panel Wedding Arch Drapery Fabric, Size: 30 Inch x 20ft (Pre-cut). Available Color: Sage Green, Dusty Blue, Ivory, Black, Dusty Rose, White, Champagne, Burgundy, Blush Pink, Lilac. Soft and lightweight, chiffon draping fabric is a great choice for wedding arch decorations, creating a romantic and elegant atmosphere.
Related Topics
basement ceiling ideas
inexpensive solutions
DIY basement decor
affordable ceiling options
easy installation
creative designs
home makeover
budget friendly
quick tips
interior upgrades
beginner friendly
home improvement
Leave a Reply